HTML is ideal for creating static websites where text and images are placed at fixed positions.
But it doesn't really support dynamic sites, where text, images, and animations are moving around on the screen.
Introduce Flash
Flash is the industry standard tool for
creating rich media content. Flash project can include:-
- Interactive website
- Animation
- Advertisements
- Audio & Video streaming
- Company presentation
- 2D or 3D games
Flash sites vs non-flash sites
Flash portfolio website
http://allexarts.ry/en/index.html
http://www.resn.co.nz/#/home
http://myfavouritething.net/
Non Flash portfolio website
http://www.rosecox.net/
http://www.tremirie.com/
Appropriate use of animation:
DO use animation to
- Explain abstract concepts
- Create subtle special effects or transitions
- Add creativity/playfulness to a site
- Draw attention
DON'T
- Use animation just for the sake of doing it
- Force a user sit through a set sequence (always provide exit option)
Flash files:
Authoring File
- Fla file is flash working file (.fla)
Published File
- SWF is an output file, you see in web (.swf)
- Can't be edited
- Can play on most operating systems
- Fairly small files
Flash interface
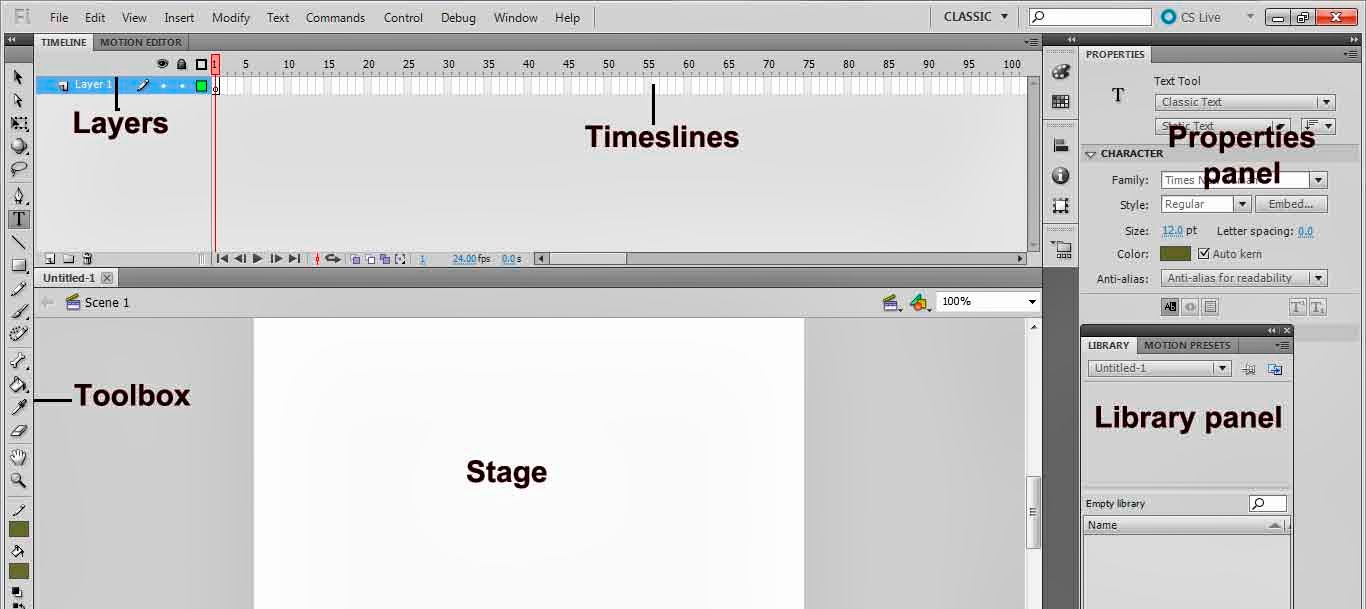 |
| Flash interface. |
The Stage is like the canvas that
defines the visible area during playback; you arrange graphics, videos,
buttons, and other elements on the Stage while authoring projects.
The Timelines controls the timing that
specifies when elements in the movie appear on the Stage. The playhead begins
at Frame 1 and moves from left to right as the movie proceeds through the
frames. Drag the layers in the Timeline to arrange the layering order of graphics on the Stage. Graphics in the higher layers appear to be placed on top of the graphics in the lower layers.
The Tools panel contains the tools used to select objects on the Stage, create text elements, and draw vector graphics.
The Property panel displays contextual information about the attributes of any selected object; you can edit these option to adjust an object's settings.
The Library panel contains media elements and symbols that are stored for a project. Use this panel to manage & organise the project's elements. When you publish a SWF file, only the Library items you actually use are included in the published file; you don't have to 'clearn out' unused elements that weren't used because they won't increase the published SWF file's size.
Drawing Tool
Select the Oval tool from the Tools panel
Select a color of your choice from the Fill color picker, located directly below the Stroke color picker.
Whenever you draw a vector shape,
you have the option of selecting two drawing modes: Merge drawing mode and Object
drawing mode. For the purposes of this tutorial, click the drawing mode
button to select the Object drawing mode at the very bottom of the Tools panel.
When the Object drawing mode is selected, the button will apprear darker and
selected.
Show the different between with Object
drawing on & without Object drawing.
Timeline /Frame
- Black dot on the frame is called keyframe.
- Red marker also known as the playhead
- Hollow circle is blank keyfram.
- Diamond-shaped dot known as a property
keyframe
Create simple flash animation
After drawing some artwork, you can turn it into a reusable asset by
converting it to a symbol.
A symbol is a media asset that can be reused anywhere in
your document without the need to re-create it. Symbols can contain bitmap and
vector images and animations, along with other types of content.
Symbol is store in
Library.
When you drag a
copy of the symbol from the Library panel to the Stage, the copy on the Stage
is called an instance of the symbol. A symbol can be reuse, resize.
Classic Tween animation
So what is a tween? Tween is the shortened term for “in-between”.
It refers to the consecutive frames between two keyframes. When you apply
tweening to an object, you are changing the objects position, appearance, or
both over a period of time.


